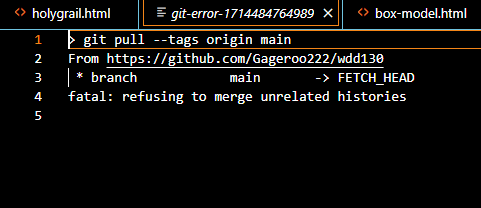
Git - GitHub - VSCode errors messages
Git: gpg: skipped <email>: No Secret Key

This has to do with how Git is configured with GPG signing process. This is an issue on Windows computers, as the GPG implementation is weird.
There are a few potential ways to fix this issue. I would recommend turning off the signing with GPG.
Here are the steps to disable this option
Go to VSCode preferences - Settings
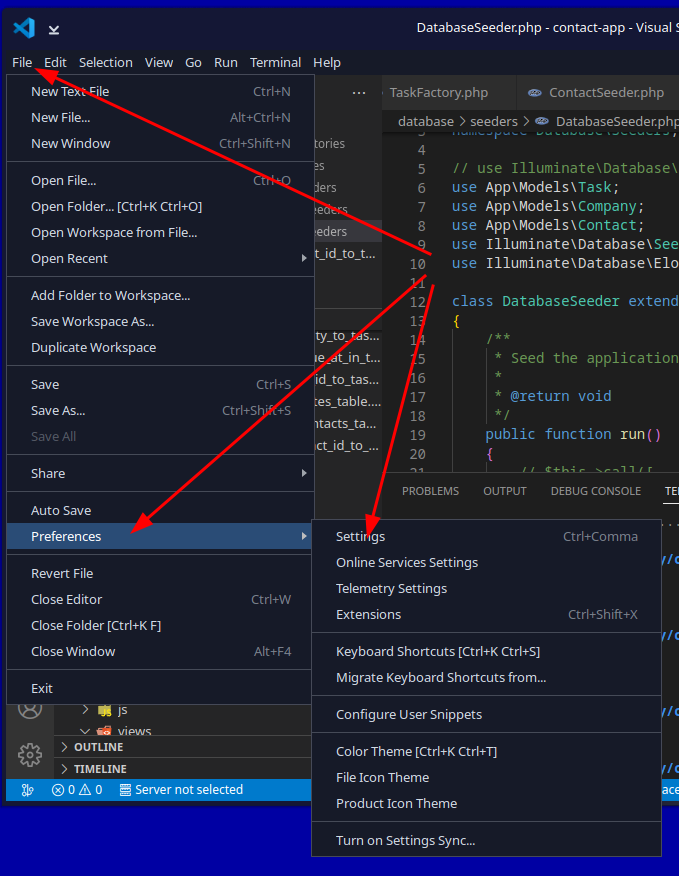
Type this into the search bar at the top to find the setting: gpg commit

Make sure this option is not checked. This is the option that tells VSCode to use PGP while pushing to GitHub: Enables commit signing with GPG or X.509

Close out of the Settings tab.
Back to TopYou don't have permission to push to <GitHub Account> on GitHub
This error occurs when you have GitHub setup on one account and you try to use another account and GitHub auto logs you into the old account with VSCode. This process is using the Windows Credential Manager.

This error is because Git was previously configured for another user account on the computer using the global settings. There are a a few solutions.
Remove Windows Credential Manager from auto logging into GitHub
This is the preferred method if the account in question is not being used anymore
There are two part to this. If you only do one of them it will work. It is recommended to do both parts.
Go to GitHub and log into the old account and click on the user profile picture in the top right of the web page.
On the left navigation menu, select
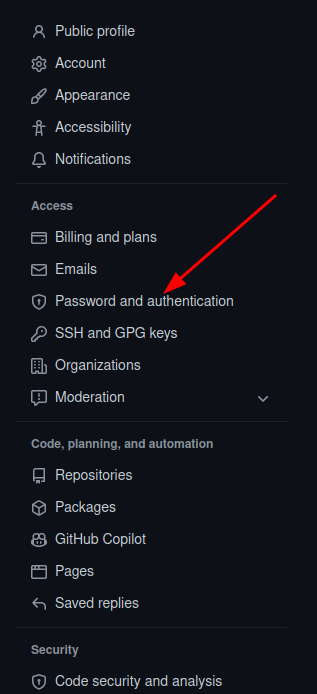
Then click on the tab

Find teh GitHub for VSCode line
Click on the to the left of GitHub for VSCode

Click the option
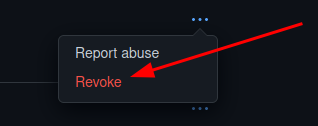
This will force VSCode to re-authenticate with GitHub.
Part two of this process is to go into Windows Credential Manager and remove the github.com auto login credentials.
Click the start menu button and type "Windows Credential" and you will see the link to this appear in the start menu. Click on that link and you will see something like this
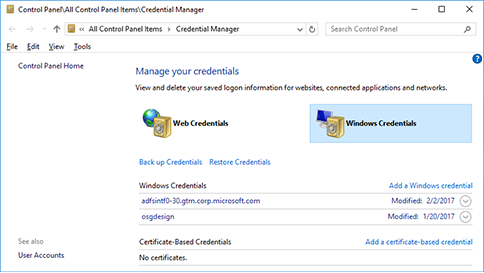
Find the entry for github.com, then click on the arrow button on the right side then select the option REMOVE. This will remove that from Windows Credential Manager.
The next set is to logout of the user account in VSCode. You do that by clicking on the PRofiles icon and then highlight the name and then clicking on Sign Out for that user.
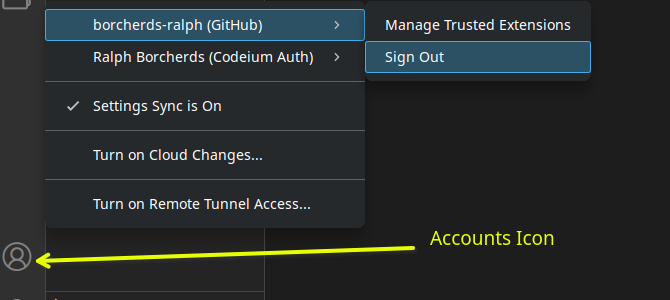
Restart VSCode and then try and publish the repository again.
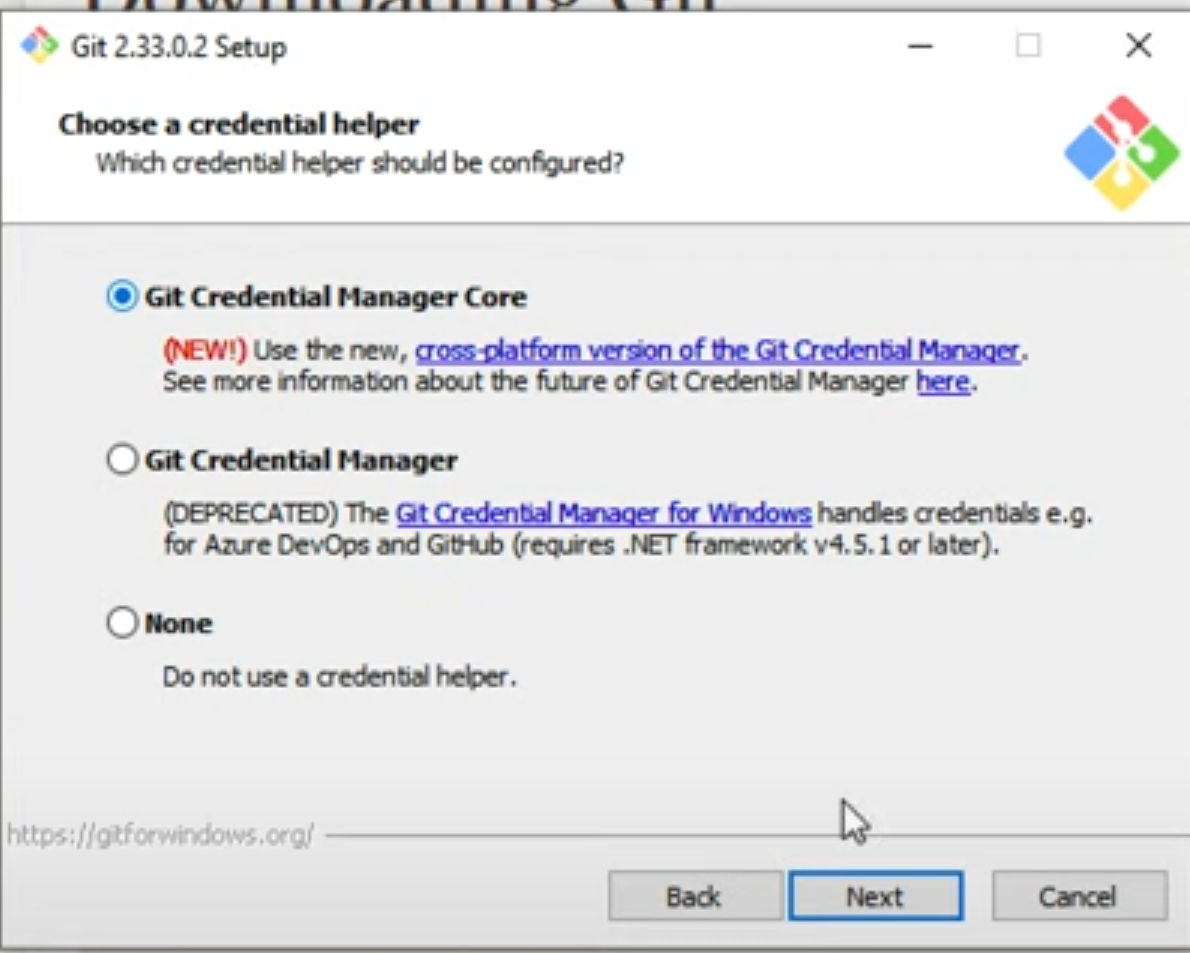
This occurs when Git is installed and told to use the Windows Credential Manager and not the Git Credential Manager Core option which is the new default. It may be worth reinstalling Git and make sure that the Git Credential Manager Core option is selected as in this image.
GitHub Pages does not initialize
There is an issue where the GitHub pages do not initialize the first time. This means you must re-initialize a push to GitHub and then recreate the pages setup.
-
Go to the pages setup page and change the branch to NONE

Click Save
-
Go to VSCode and push to GitHub
You can do an empty push by typing the following commands in the command prompt
                            git commit --allow-empty -m "Trigger rebuild"

git push -
Go back to GitHub Pages and recreate the pages setup.
Once you have clicked save on the pages setup, click on the tab

Watch the top entry until the icon to the left turns blue or green with a check mark. That means it is complete. The red circle with an X means that it failed.

You will notice that the process will take longer than 1 minute. This is due to some change GitHub has made on the server due to new features that are being added. Even publishing the push/sync from VSCode takes as long as 5 min on very busy days.
If the user gets a failed again, check the spelling of the folders and file names. This process seems to fail if the user has spaces in the folder and filenames and sometimes if there are underscores in these names.
Make sure to configure your 'user.name' and 'user.email' in git
If the user gets this error, they missed that step in the configuration of Git. It is found in the installation steps of Git for Windows.

Open the terminal or command prompt. This can be the one inside VSCode
Type each of these commands into the command prompt/Terminal window
                        git config −global user.name 'github user name'

                        git config −global user.email 'email address used on github'

                        git config --global core.ignorecase false
Try to push to GitHub
If you still have issues, then contact someone for help
Back to TopVSCode push/sync to GitHub seems to hang and not do anything
There are a few reasons as to why this will occur. There are a couple of things to try.
-
Open a terminal/command window and try to push to GitHub using the command line
git push
You may get an error that says something like this (It will look different on the various OS's):
                                There is no tracking information for the current branch.

                                Please specify which branch you want to merge with.

                                See git-pull(1) for details


                                git push <remote>  <branch>


                                If you wish to set tracking information for this branch you can do so with:


                                git push --set-upstream origin master
If you get that error at the command line type in the command
git push −set-upstream origin master
Then do a git push command
You may be prompted to authenticate with GitHub again.
Once the push/sync is complete, you will need to restart VSCode and the GitHub controls within VSCode should work again.
- The other reasons why this process will hang are too numerous and hard to give instructions on how to overcome in this document. This will require more research with debug logs to see if there is a reason for the hang.
Windows Error message: App or process blocked: git.exe
User is trying to run git commands at the command prompt and Windows is displaying the following Windows System error
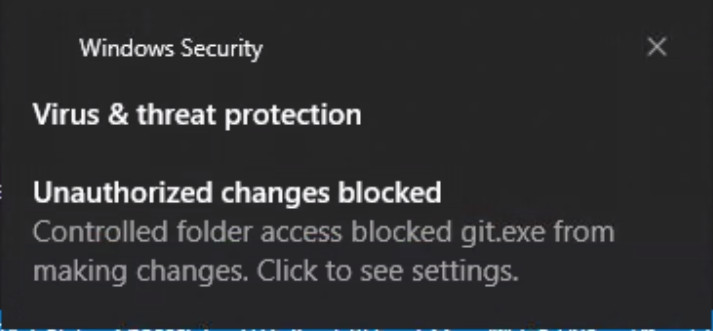
The instructions to fix this are specific to the version of Windows that is being run. Here are the basic steps: https://support.microsoft.com/en-us/windows/allow-an-app-to-access-controlled-folders-b5b6627a-b008-2ca2-7931-7e51e912b034
Use controlled folder access
Controlled folder access in Windows Security reviews the apps that can make changes to files in protected folders and block unauthorized or unsafe apps from accessing or changing files in those folders.
- Select Start> Settings> Update & Security> Windows Security> Virus & threat protection.
- Under Virus & threat protection settings, select Manage settings .
- Under Controlled folder access , select Manage Controlled folder access .
- Switch the Controlled folder access setting to On or Off .
There is an option to allow just one program to run in this Controlled Folder Access and you can select git.exe from the recently blocked programs.
If you look at the Windows Notifications, you may see an error like this.

This is the same step as above for the same error. Microsoft has a few diverse ways to present this message. It will also be logged in to the System Logs.
Back to Topgit RPC fail: curl 18 transfer closed with outstanding read data remaining

A few reasons I have seen this curl 18 error:
- Too many files - This is usually related to #3
- Anti-virus software
- Number of files and sizes exceeds the buffer size for git. See this article: https://9to5answer.com/git-push-gives-error-rpc-failed-curl-18-transfer-closed-with-outstanding-read-data-remaining
- Speed of internet can also cause this issue. https://debugah.com/git-clone-error-rpc-failed-curl-18-transfer-closed-with-outstanding-read-data-remaining-18415/
- Running Homebrew on a MAC or Linux machine. There are known issues at times with this error in Homebrew. Homebrew is not supported for students and they will have to find the answers on their own as Homebrew has its own command structure to work with Git & GitHub.
git RPC failed; curl 92 HTTP/2 stream 0 was not closed cleanly: CANCEL (err 8)

This error has to do with the amount of data being sent to GitHub. On bad internet connections, you can only send enough data that GitHub will keep the connection open. Bad internet connections will drop with this error. There are other reasons this error can occur, but this is the only reason for this error with the data we use.
Back to TopGit does not allow you to add a folder to the repo
If you type the git add <foldername> and get an error that looks like this
Git Error - 'main/' does not have a commit checked out
The issue is mot likely that the folder has been initialized as a git repository. Go into that folder and look for the hidden folder/directory called .git
Remove the .git folder in the sub-directory
Back to TopError: Failed to push some refs to…
Updates were rejected because the tip of your current branch is behind its remote counterpart. Integrate the remote change (e.g. 'git pull …') before pushing again.
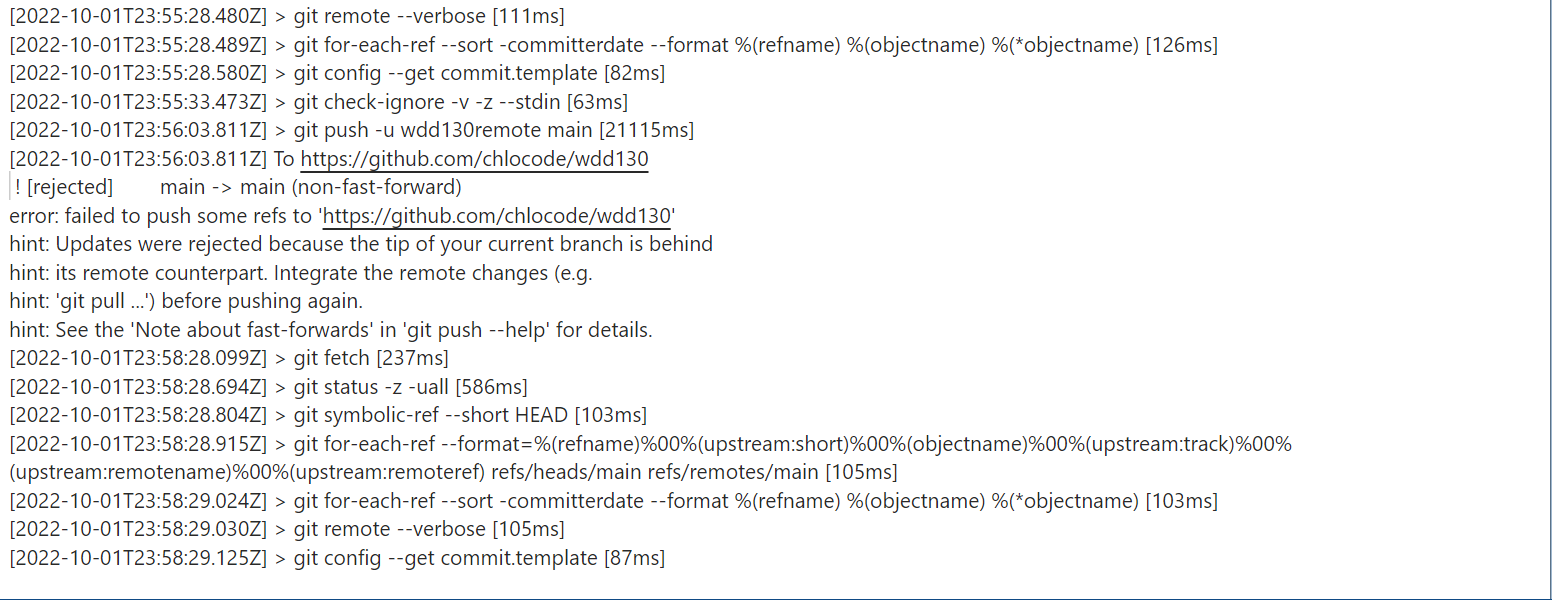
The reason for this error is that the code on GitHub was edited and the user did not issue a git pull command before making any changes to their local machine before they started to edit on the local machine.
To fix this error there are a few options.
- The first and usually the easiest for those new to Git/GitHub is to recreate the repository. You have to unpublish the site, delete the repository, delete the .git folder on the local and then push back to a Public Repository on GitHub.
-
The preferred way is to stash the changes, pull from the server, merge your stashed changes into the update from the server and then push back to the server.
Run these commands:
                                git stash

                                git pull

                                git stash pop <− This will apply your saved changes

                                git commit -m “message”

                                git push

                                git stash clear <− This will remove the stashed files from memory. Stashed files stay until removed.
- You can try and issue a 'git push -f' command at the command line and see it will go through. This is still not a guarantee that it will push.
-
You can create a new branch and push to the new brach. You can then go to the fork and use the built in process on GitHub to validate the change in the fork and merge back to the master/main branch. (This is the way most companies do development)
Create a new branch in VSCode
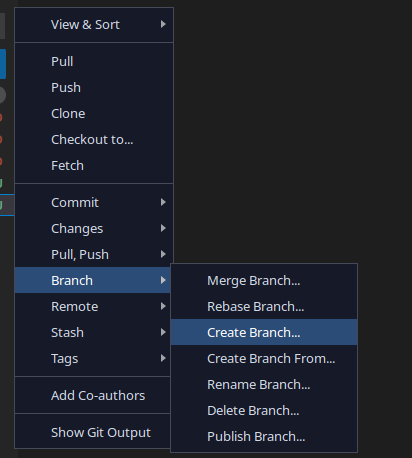
Give the branch a new name

Commit and push the new branch
Open GitHub repository
You should see a message like this

Click the Compare & Pull Request button
You will see a screen like this
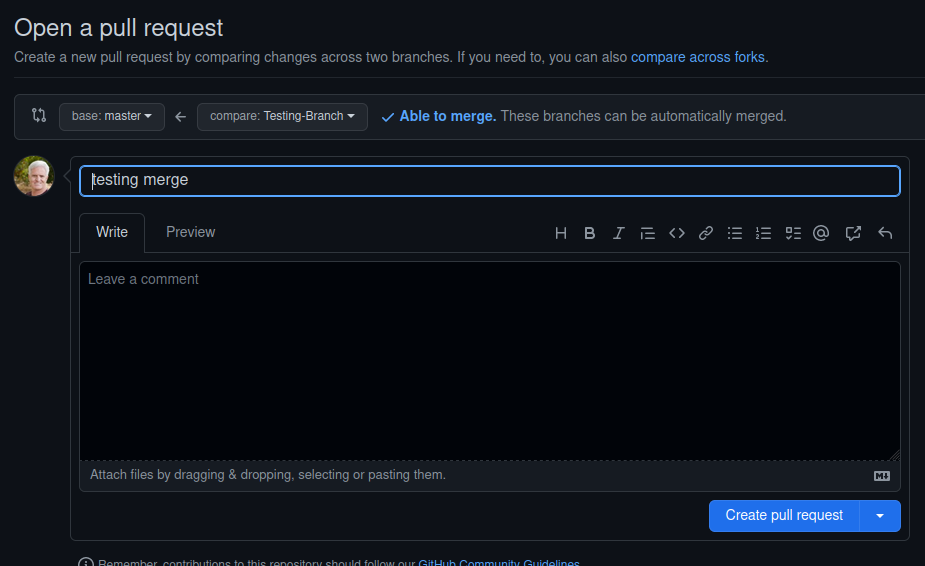
You can type a comment in box where it says Leave a Comment.
Click the Create pull request button
Hopefully you will see this message

If you see a message that state there is a conflict, you will have to fix the conflict using one of the options suggested.
Once the conflict is resolved and you get this message, click the Merge pull Request button
You will then be asked to confirm the merge

Click the Confirm Merge button
Once the merge is successful you will see this message. Go ahead and delete the branch by clicking the Delete Branch button

If you do not delete the branch you will always push to this branch from VSCode by default now.
Go back to VSCode
change back to the master branch by using the Checkout To option
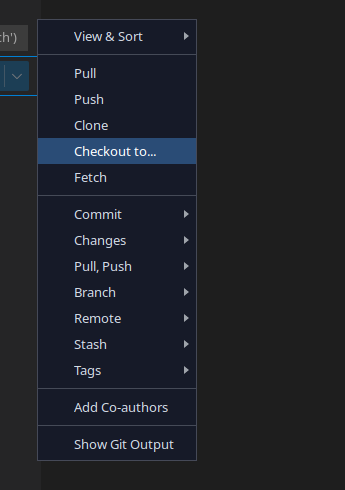
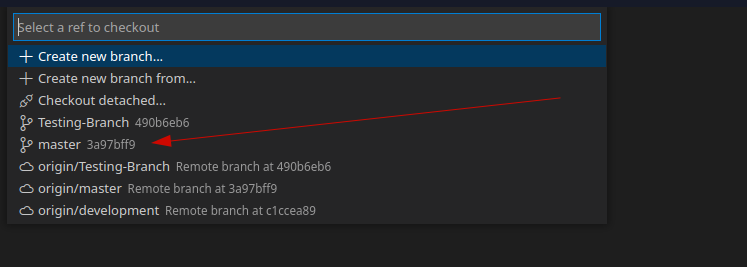
Select the Main/Master branch. Go by the name and not the number.
To remove the local branch open the command prompted
Run this git command at the command prompt
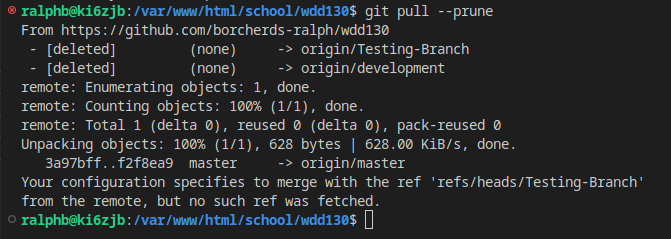
git pull −prune
You will see something like this if it works
git branch −d <branch name>

This screenshot shows what happens if you have not switched to the main/master branch first and the branch has not been fully merged. These entries are denoted with the red dot to the left of the command that was run.
You must CHECKOUT the main/master branch first
You can force the delete by using the -D option. Lowercase −d for the check and uppercase −D to force the delete.
You should now only have the one branch on your local computer. This is the preferred option for most classes at school. YOu will have multiple branches if you are working as a group on a single project.
User is prompted git-credential-manager-core.exe could not be started
User gets this prompt every time they go to sync with GitHub
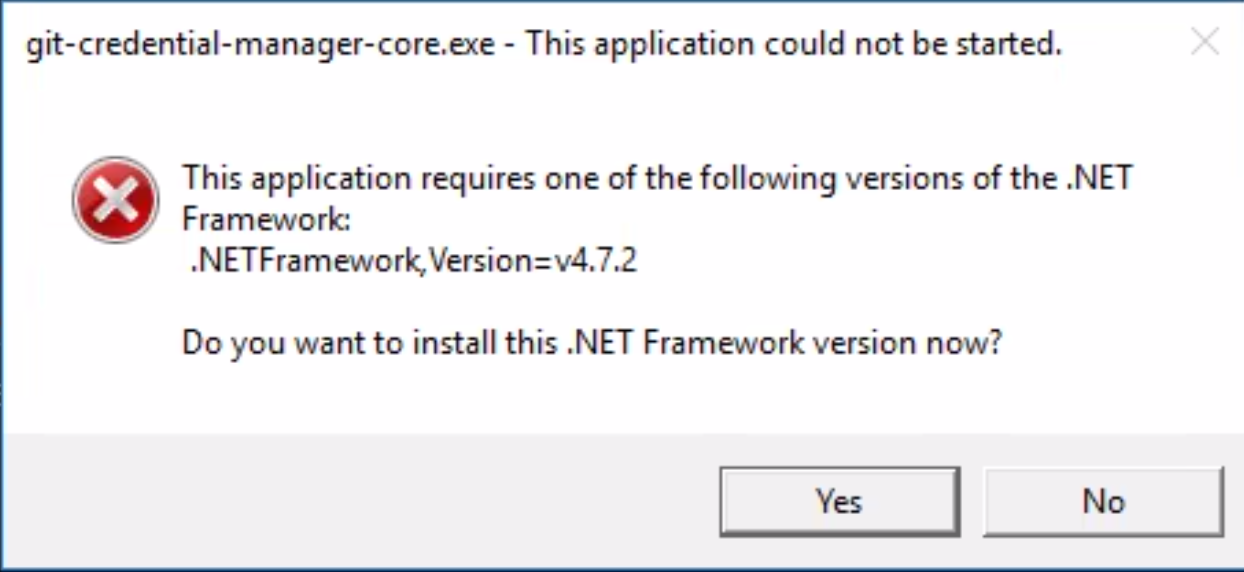
You have to install Microsoft .Net 4.7.2 to get rid of this prompt and to have Git remember your GitHub credentials.
If internet connectivity is an issue, then use this URL to go directly to the download page and download the off-line installer. Install the software, reboot the computer and try to sync with Github.
You should not be prompted for this again. If you do then the install did not work correctly.
If you get the following message
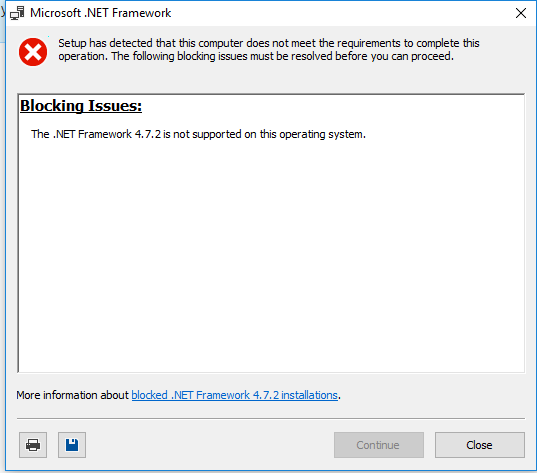
You must update Windows to at least Windows 10 version 1607. You can tell which version you have boy going to the About option in the Windows Settings.
This post on Microsoft Support site shows you how to find which version of Windows you are running. Find operating system info in Windows 10
Back to TopMacOS error: xcrun: error: invalid active developer path
Error when running git --version on MAC
When running the "git --version" or "git version" on a Mac, you may encounter this error:
xcrun: error: invalid active developer path (/Library/Developer/CommandLineTools), missing xcrun at: /Library/Developer/CommandLineTools/usr/bin/xcrun

To fix this error you must run the following command in a terminal window on the Mac.
xcode-select --install
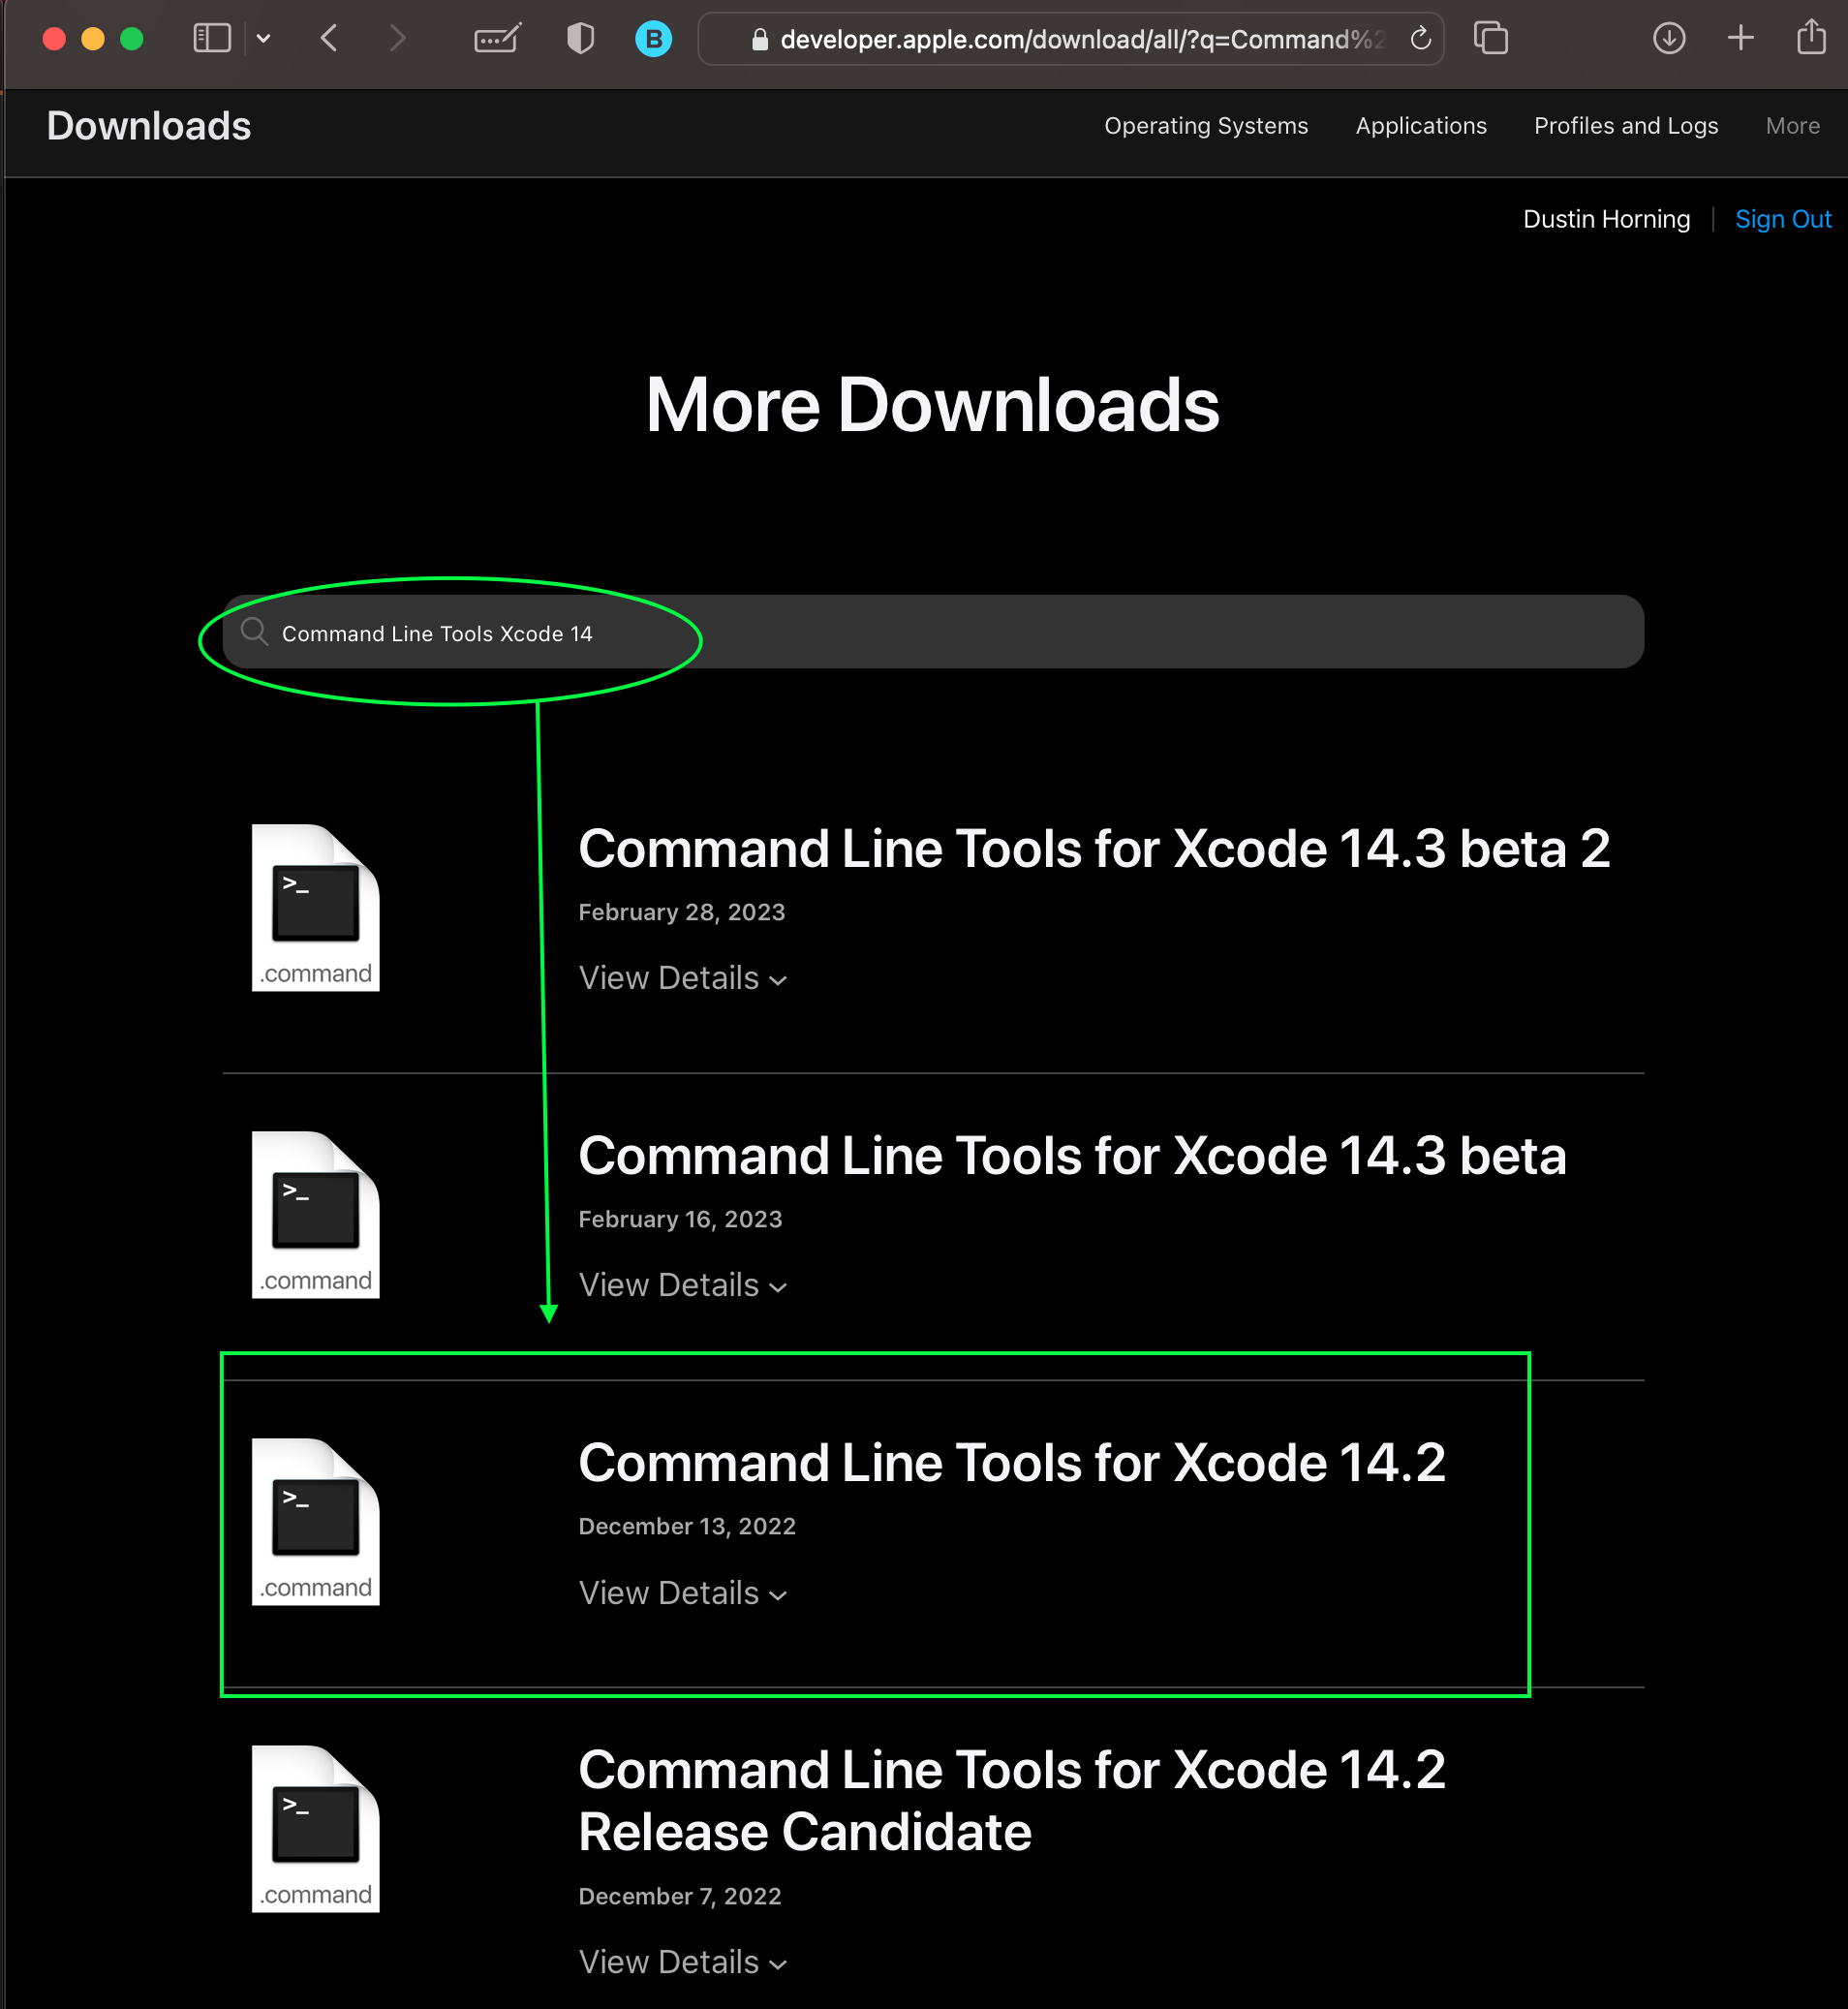
The other way to install these tools is to goto the Apple Developer software page and install from there: https://developer.apple.com/download/more/
Look for the: "Command Line Tools for Xcode" with the version number that matches your OS version number and does not contain the word 'BETA' as part of the filename. It will look something like this screenshot.
Once the software has been installed make sure to restart the VSCode
application by
clicking on the menu and select QUIT, ( -q)
-q)
Git LoadLibraryExW() failed with" The specified procedure could not be found.?

If you open the Show Command Output you will see the following error: git failed to load library libcurl-4.dll
To resolve this error, you must find the libcurl-4.dll file on the system and make a copy of it to the C:\Program Files\Git\bin\ folder
for some reason even though Windows generally has the folder that this file can be found in the Path Environmental settings, Git does not always see it and cannot load it.
Most Windows systems has this file located in C:\Windows and this folder is part of the Path setting on Windows computers.
Error You must install Git first
This error may come up even after you have install the Git software. If that is the case follow these steps.
Open the Extensions tab.
Click on the 3 dots in the top right corner.
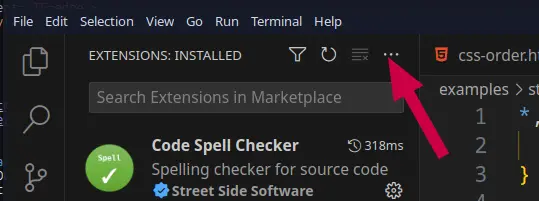
Select Views then Disabled extensions
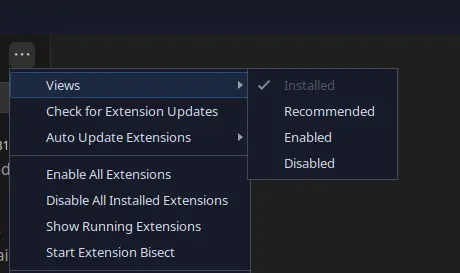
You will now see a new option in the extensions tab that says disabled. It should have a few extensions in there. You can make that area bigger by clicking on the bar that says DISABLED and then dray the top line of the box up.

Click on Git and then in the right side editor click the enable button
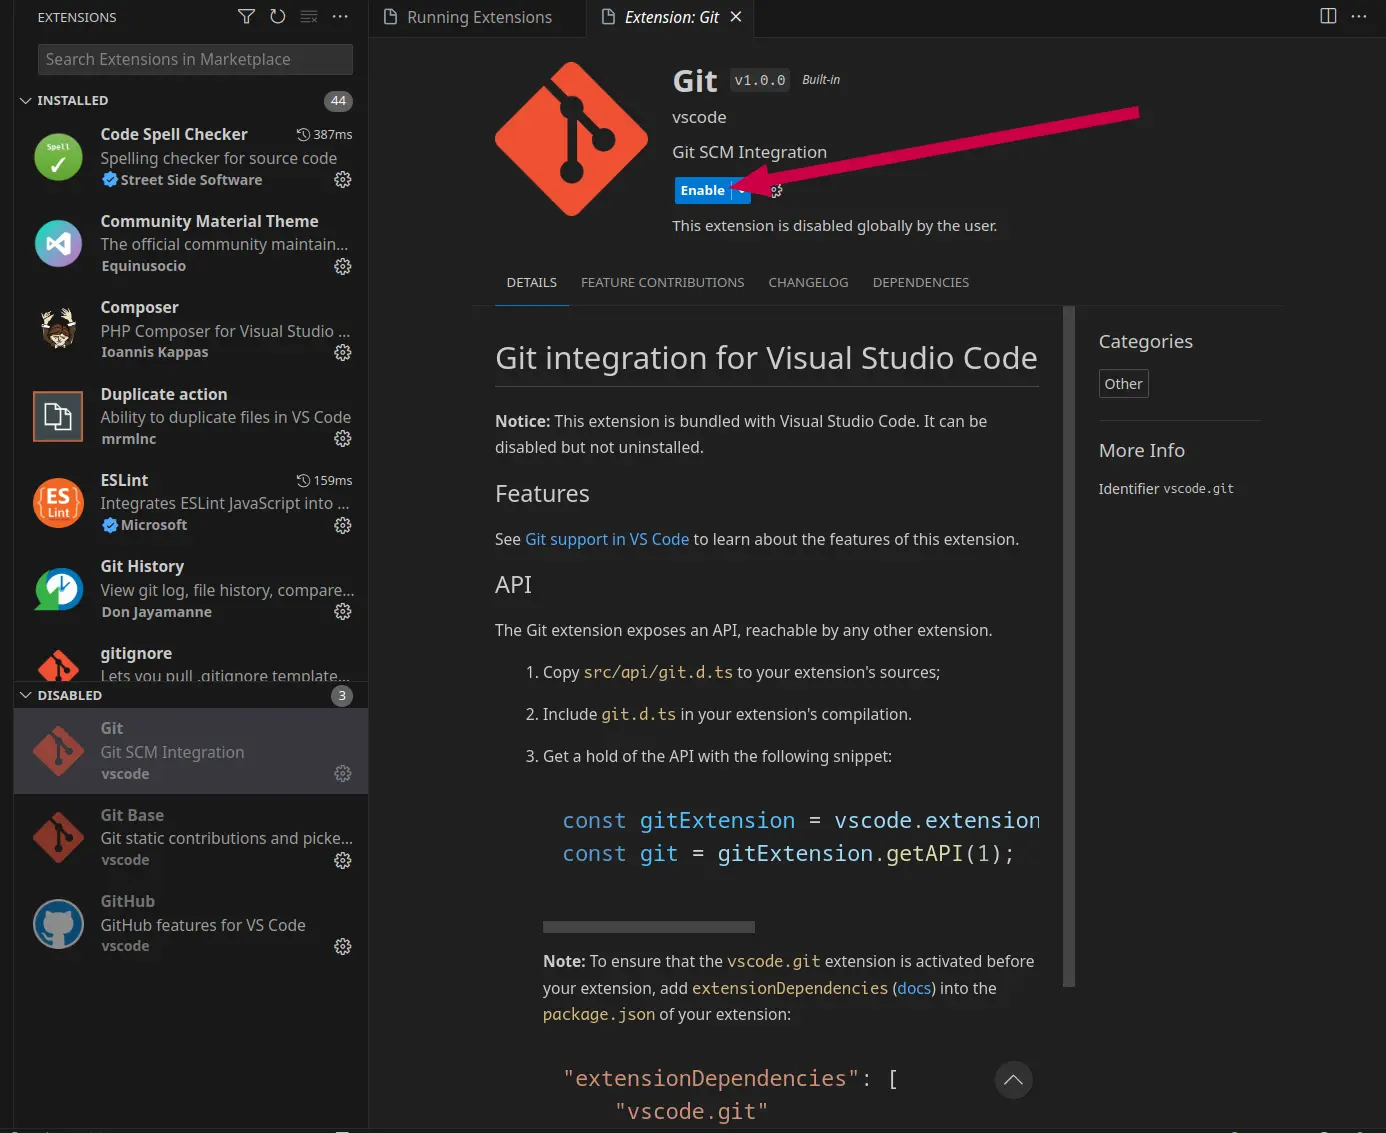
That will auto start Git and Git Base if disabled. If you have GitHub disables as well, you will need to start that using the same process.
Back to TopNever get the Web Page to log into GitHub to authorize Git/GitHub
If you never get the web page to open to authorize Git or GitHub use from withing VSCode, You may have an issue with the default web browser setting on your computer.
Windows users:
- Install the browser of your choice, if you haven't already.
- Open the Windows Start menu and click Settings.
- Click on Apps and then Default Apps.
- Scroll down and select the current default browser under the "Web Browser" section.
- Choose a new web browser from the list and click Set as Default. You may need to repeat this step for different file or link types.
MacOS Users:
- Download your preferred web browser.
- Install your browser. Double-click the downloaded DMG file
- Click the Apple logo in the top-left corner of the screen.
- Click System Preferences…
- Click General
- Click the "Default web browser" drop-down box.
- Select a Default web browser
Linux Users
This command will show you what your current default web browser is:
xdg-settings get default-web-browser
To set the default browser you will use this following format command. Change the firefox.desktop to the browser of your choice
xdg-settings set default-web-browser firefox.desktop
Common browser name:
firefox.desktop, google-chrome.desktop, brave-browser.desktop, microsoft-edge.desktop, opera.desktop
Back to Top
Github Pages Build process fails
There are 2 potential reasons that have been identified with students.
User setup GitHub Pages incorrectly
To verify if this is the issue you need to look for this in the error log of the GitHub Pages publishing process.
Step 1:
Go to the Actions tab of the repository

Click on the pages build and deployment link next to the error icon

Then click on either option to see the error
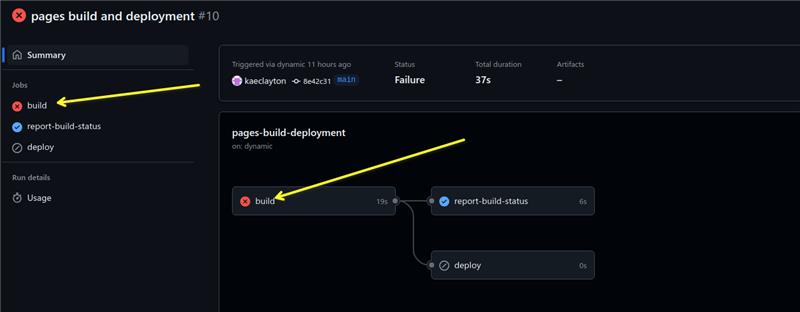
This is the error and the part that tells you what is wrong is at the end

This is the error text you need to look for at the end of the message
Error: No such file or directory @ dir_chdir0 - /github/workspace/docs
What the student did was to change the folder in the GitHub Pages setup page. They student has something like this:

It must be the root folder like this.

Once the user changes it to the root folder and saves the change, a new publishing process will start and it should publish if that is the only issue.
User creates a repository within a repository
This issue does occur and can occur if the student creates multiple repositories during the course.
You will first notice that your project did not build and if you look on the code page in GitHub, you will find the last commit message has a red X to the right of it.

Click on the Red X and you will be presented with something that looks like this.

Click on the details option next to the item with the red X

Look for the error lines. They start with the word Error: and are in red background color by default
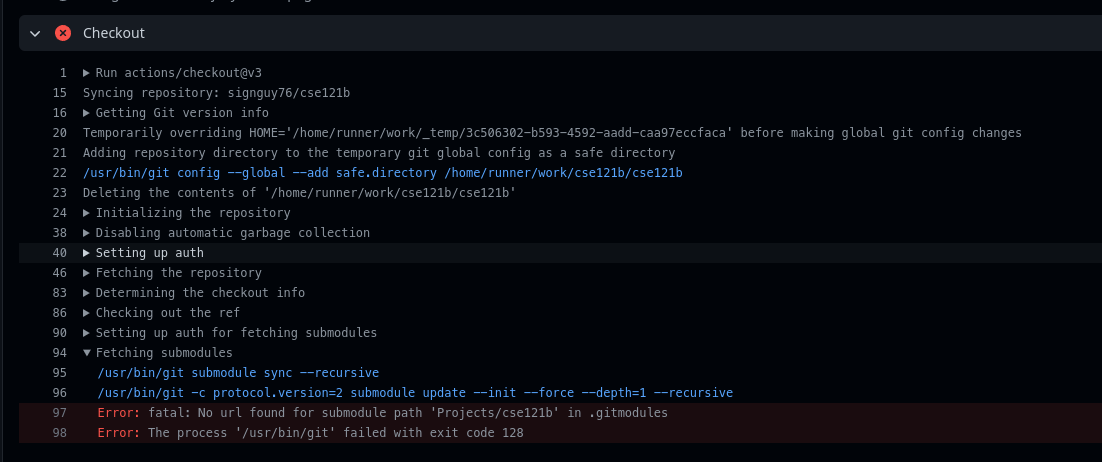
If the first like of the errors reads like this:
"Error: fatal: No url found for submodule path <path to issue> in .gitmodules"
If you have this issue. You have a sub-folder that is also been initialized to be a git repository
Another way to see this potential issue is to look at the code and look at the location in the error above. You should see a folder icon with an arrow pointing to the right next to the folder name like this
A third way to check this is in VSCode.
To fix this you have to go into the sub-folder mentioned in the error and delete the hidden folder called .git
Easiest way to do this is within VSCode. Go to the source control area and click the 3 dots to the right of Source control
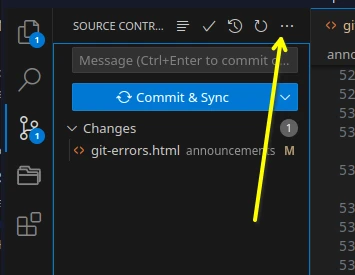
Select Views then click Source Control Repositories

This will then show you all the repositories under the main folder that is open in VSCode. It will look something like this if there are more then 1.

How to delete the second local repository.
Use your file manger and go to the sub folder with the initialized repository. Make sure to turn on "Show Hidden Items" and look for the .git folder name and delete it. Do not delete the one in the root folder.
For example: do not delete the wdd130/.git folder, but delete all other .git folders in sub folders under the wdd130 folder.
How to do this form command line/terminal using VSCode.
Windows Users
Option 1:
- open terminal
- Change the terminal type to Git Bash by clicking on the chevron pointing down next to the Plus sign
- Change folder to the folder with the second repository. For example using
the image above:
cd cse210b
- Type the following command:
rm .git -rf
Option 2:
- open terminal. It will default to Powershell
- Change folder to the folder with the second repository. For example using
the image above:
cd cse210b
- Type the following command:
Remove-Item -Recurse -Force .git
Mac and Linux users
- open terminal
- Change folder to the folder with the second repository. For example using
the image above:
cd cse210b
- Type the following command for Git Bash:
rm .git -rf
Once done commit and sync with GitHub so that the build process can be re-initialized
You get the following error: fatal: Unable to access 'git repository url': OpenSSL SSL_read: SSL_ERROR_SYSCALL, erro 0
This error id due to some SSL connectivity issue between your computer and GitHub. There are a variety of reasons why you will get this message.

The easiest way to fix this is to re-install/update Git. Go to git-scm.com and download and install the software.
Windows computers You can update using one of two methods
- Run this command in a CMD prompt on Windows:
git update-git-for-windows
- Download the files and run the installer manually. You can get the installation instructions here: Download for Windows
Mac Computers Apple suppies the version of Git to run through the XCode software. You must check for software updates for your Mac and install those updates. This is done through the App Store on the Mac. It is a good idea to install all those updates on a regular basis. You can get all the instructions for Mac here: Downloads for macOS
Linux ComputersIf you instal the Git software correctly, you should only need to use your package manager and run the updated command to get the most recent updates. You can get all the install commands for the various Linux Distributions here: Downloads for Linux
You do need to update Git at least every 4 months, sometime sooner. Git releases updates to the major point release about every 2 to 3 months with bug fixes randomly withing that timeframe.
As of when this was written, this table shows the last 3 major point releases with the bug fixes.
| Version | Release Date |
|---|---|
| 2.43.0 | Nov 20, 2023 |
| 2.43.1 | Feb 9, 2024 |
| 2.43.2 | Feb 14, 2024 |
| 2.43.3 | Feb 23, 2024 |
| 2.44.0 | Feb 23, 2024 |
| 2.45.0 | April 29, 2024 |
These are suggestions and hints
User is prompted to configure formatter
User is prompted to configure formatter
If the user installs the Prettier extension, which is not needed, the first time they go to format the code, they will be prompted to select a formatter for that type of file type (HTML or CSS). VSCode as a code formatter built into the editor that works well with HTML, CSS, JavaScript, and PHP.

One of the issues with the Prettier formatter is that is closes null tags. What this means is that tags such as the img tag will be closed with> at the end. This is XHTML syntax and not part of HTML5 standards.
Prettier is what is knows as an Opinionated Formatter. It is opinionated in that the creators of it are stating what they believe is the best way to format something even if it goes against the standards or not explicitly stated that this is the way it must be done. They do not give you the option to turn that off. VSCode setting does give you that option.
Back to TopPushing to GitHub using fewer steps
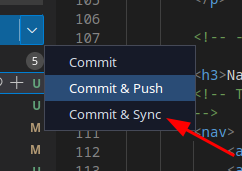
When you are on the Git tab in VSCode, the button to Commit and Sync may state Commit only. If you click on the down arrow to the right of the button and select Commit & Sync

If this is the first time you are doing that you should see the following messages. On the first dialog, click the Always button

On this next dialog if you get prompted, click the OK, Don't Show Again button

Sometimes these will prompt the second time you click on the Commit & Sync option.
You can change your Commit button to Say Commit & Sync by doing the following
- Go to the VSCode Settings

- In the search bar search for Git: Post Commit Command

- Change the option on that command to be sync

This will make it possible for you to click the button once and commit and sync at the same time. Just click this button and both steps are executed in order.
 Back to Top
Adding a description to your repository
One of the things you will see in a lot of repositories is a description of what the repository is all about, how to install and use the code, etc.
This is all done using Markdown text. This will show you the details of how to use that so you can describe wheat you repository is all about.
First you need to create a file in the top level folder called README.md. It must be capitalized for GitHub to recognize it as the description file for the repository
Teh following information comes from the Markdown Guide website basic syntax page.
The basic syntax is as follows:
| Markdown | HTML | Rendered Output |
|---|---|---|
# Heading level 1
|
<h1>Heading level 1</h1>
|
Heading level 1 |
## Heading level 2
|
<h2>Heading level 2</h2>
|
Heading level 2 |
### Heading level 3
|
<h3>Heading level 3</h3>
|
Heading level 3 |
#### Heading level 4
|
<h4>Heading level 4</h4>
|
Heading level 4 |
##### Heading level 5
|
<h5>Heading level 5</h5>
|
Heading level 5 |
###### Heading level 6
|
<h6>Heading level 6</h6>
|
Heading level 6 |
This is regular paragraph text
|
<p>This is regular paragraph text</p>
|
This is regular paragraph text |
Heading Best Practices
Markdown applications don't agree on how to handle a missing space
between the
number signs ( # ) and
the
heading name. For compatibility, always put a space between the number signs and
the
heading name.
| Do this | Don't do this |
|---|---|
# Here's a Heading
|
#Here's a Heading
|
You should also put blank lines before and after a heading for compatibility.
| Do this | Don't do this |
|---|---|
Try to put a blank line before...
|
Without blank lines, this might not look right.
|
Paragraphs
To create paragraphs, use a blank line to separate one or more lines of text.
| Markdown | HTML | Rendered Output |
|---|---|---|
I really like using Markdown.
|
<p>I really like using Markdown.</p>
|
I really like using Markdown. I think I'll use it to format all of my documents from now on. |
Paragraph Best Practices
Unless the paragraph is in a list , don't indent paragraphs with spaces or tabs.
| Do this | Don't do this |
|---|---|
Don't put tabs or spaces in front of your paragraphs.
|
This can result in unexpected
formatting problems.
|
How to share a computer to commit to GitHub using different accounts
This process is quite easy. Go to the command prompt/terminal for the root of the project. Then type these commands.
You will notice that you have already typed these commands with the global option. These commands sets these for the specific repository only.
git config user.email "email"
git config  user.name "github username"
You can check your Git settings with: git config user.name && git config user.email
on some systems you will have to run a second command in the terminal
git commit --amend --reset-author --no-edi
You can also do this manually in the .git/config file found in a hidden sub-folder under the root folder of the repository.
Add the following line to the end. Make sure to keep the indentation. It must match what is already in use in your file.
[user]Back to Top
name = YourName
email = your@email.com
How to add a quick link to your GitHub Pages URL
Log into your repository on GitHub.Then click on the cog icon to the right of the word About.
Click the checkbox for "Use your GitHub Pages website".
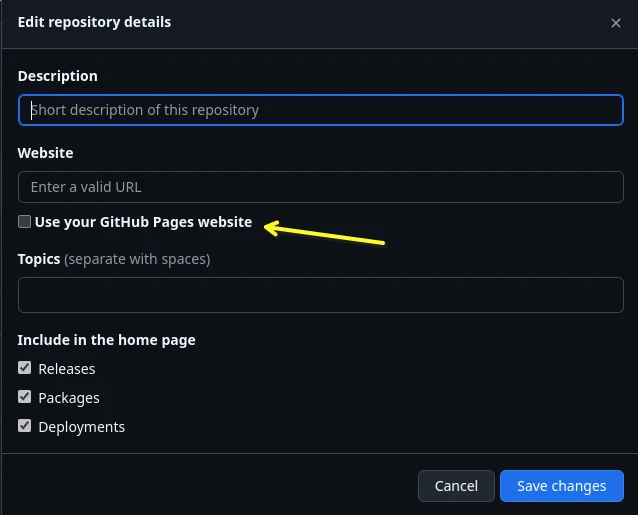
You can add tags to your repository such as HTML5, CSS3, School work, etc. You decide what topics you want to use.
It is also recommended to uncheck the Releases and Packages checkbox's. We do not create a release or a package in this class. Those are for code repositories where you are releasing code as software to download and use on a computer or in another program.
You can click the save button at the bottom of the modal and then you will see the link to your GitHub Pages website. on your repository page.


